
epc functionality
Using PlanUp EPC functionality
Whilst using PlanUp it is possible to record elements of EPC data at various stages of drawing the plan.
You can record:
- positions of EPC related items using a variety of EPC symbols e.g. stopcocks, boiler flues, loft hatches, etc
- item specific data e.g. glazing and draft proofing for doors, windows, etc
- room specific data e.g. is the room habitable, heated, part of the main building or an extension, etc
- heat loss types
- construction details
Everything recorded for the EPC in PlanUp will be collated/used for calculations as appropriate in a report which will be available to view after finishing the plan - see EPC Report.
There are some further symbols not listed above with some additional functionality that can help with plan information/display.
EPC Symbols
If you are using the DEA version of the software (determined when you create your account – it is the same download) it is possible to record elements of EPC data at various stages of drawing the plan.
Items such as programmers, loft hatches, boiler flues and so on can be added to the plans. A specific menu for EPC only symbols is available on the top tool bar by tapping on the PRG button. These items are detailed in full in the toolbar reference guide.
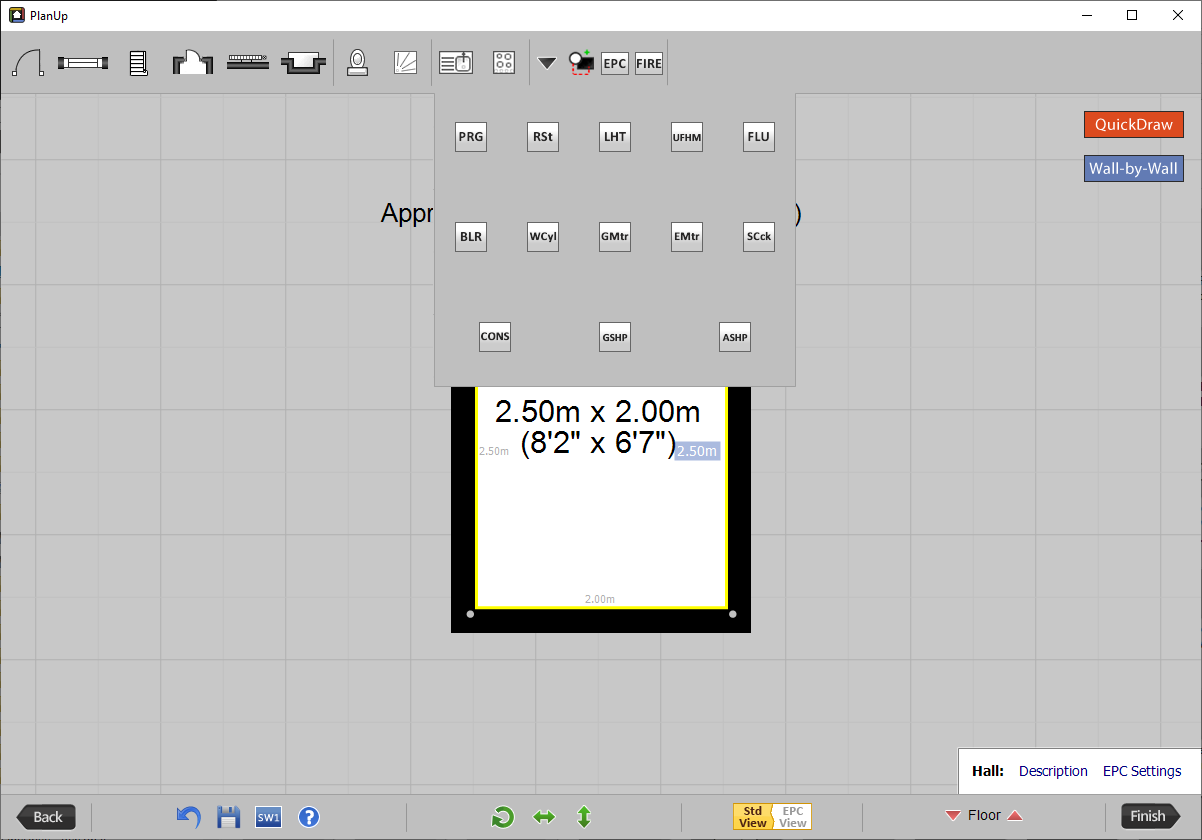
These symbols will only show on the EPC plans and not on the marketing plans used by estate agents.
Item specific EPC data
Certain standard items can have EPC information recorded about them. The items that have EPC data that can be recorded are:
Windows
All windows have the option to record:
- The glazing type
- The dimensions
- The draft proofing
Tap on the window to bring up the popup menu:
- The main menu for windows contains the glazing options – select as appropriate.
- Tap on dimensions to select or enter the measurements. The width will automatically show as it is drawn, but if you tap Other... and enter the width measurement the window will resize accordingly.
- Tap on Proofing... and you can select as appropriate.


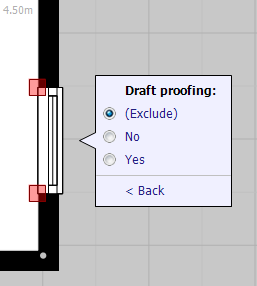
As long as both the width and height of the window are entered PlanUp will calculate the window area and make adjustments to alternative walls as appropriate.
Please note that glazing areas for non-separated conservatories are treated differently. Please see Non-Separated Conservatories in heat loss for more details.
Doors
Any doors (except garage doors) have an option to record:
- The glazing type
- The height
- The draft proofing
- The number of openings
To do this, tap on the door to bring up the popup menu. You will see on the menu options for:
- Glazing/Frame
- Height/Proofing
- Openings
The menu will update accordingly giving you the options to record what you wish. Below in order: main menu, glazing, draft proofing, openings, and dimensions menus.


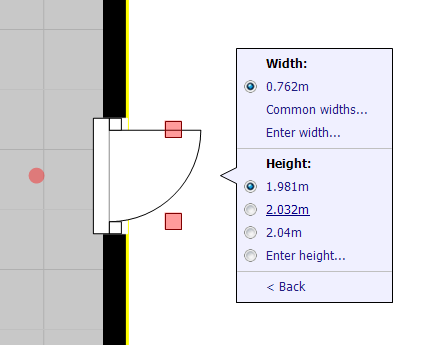
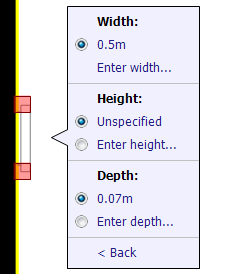
The width of the window can be set either drawing it to size or by setting the width in the Dimensions… menu. If the height is set as well, the window area will be removed from the alternative wall areas as appropriate.
Radiators and other heaters
Radiators, storage heaters, etc will be counted (each counted separately) and the totals available in the EPC report. The number of radiators with TRVs is also counted. TRVs can be marked by tapping on the radiator and marking the option in the popup menu.
You are also able to record the dimensions of the radiator and if it is a convector.
It is also possible to mark the radiators for use on the estate agent plan or not.

The radiator and other heater options available are:
- Single/double/triple radiator
- Alternative radiator
- Storage heater
- Heated towel rail
- Warm air vent
- Electric heater
- Column radiator
- Water/oiled filled radiator
Fireplaces
Once a fireplace has been added you can choose the type of fire/heater it is from the popup menu:

Baths and shower
For baths and showers, it is possible to record mixers. To do this simply select the bath/shower once it has been added to show the popup menu and there will be options visible to record a mixer.


Room specific EPC data
Once a room has been drawn there will an EPC Settings menu available at the lower right corner of the window – this allows you to record EPC data specifically for the selected. Tap on EPC Settings to show the menu shown below:
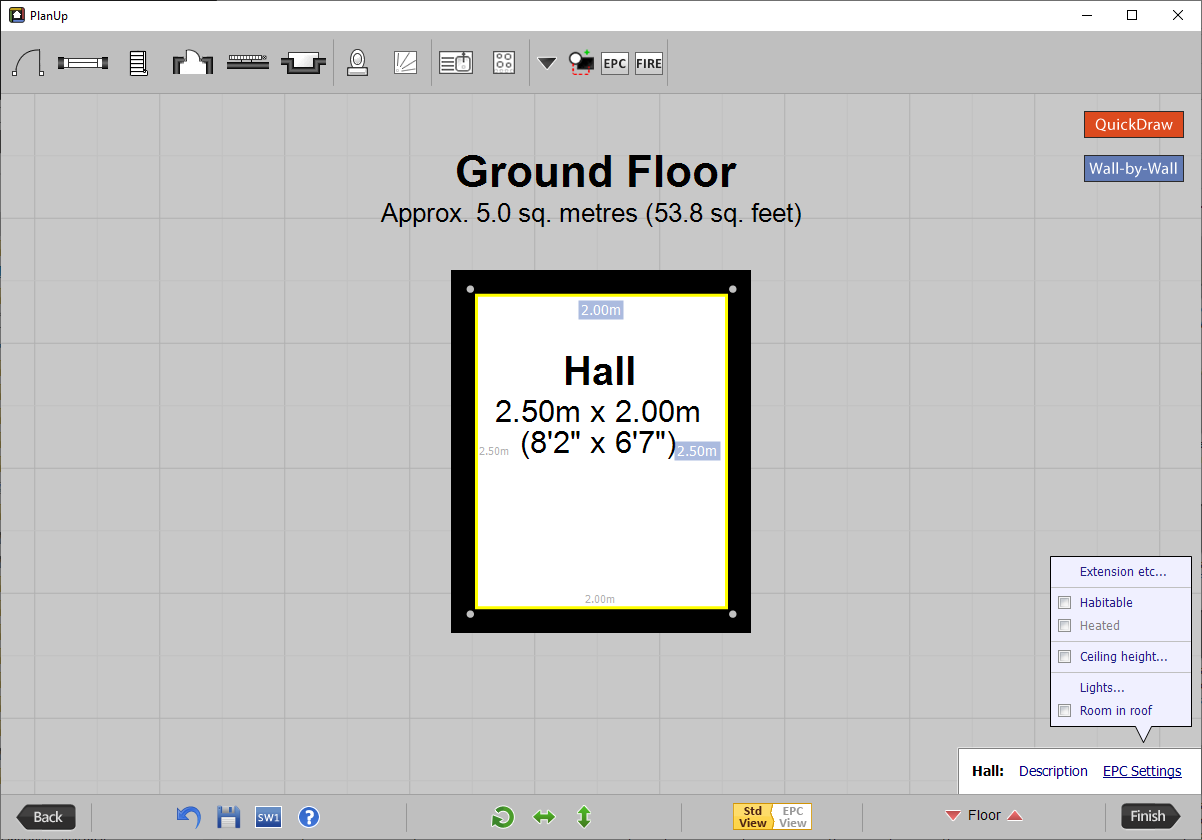
From this menu you can:
- Select Extension etc… to record:
- If the room is part of the main house.
- If the room is part of an extension – up to 4 separate extensions can be noted.
- If the room is a non-separated conservatory. Please see Heat Loss for how to set glazed perimeter details - this is a heat loss type.
- To be excluded from the EPC.
- The construction for the section of the house that room belongs to e.g. main, extension 1, etc.
- The insulation for the section of the house that room belongs to e.g. main, extension 1, etc.
- Record if the room is habitable or not.
- If you name the room first this will default to habitable in appropriate circumstances e.g. if the room is titled as lounge – this automatic choice can be overridden.
- If the room is habitable you can indicate if it is heated or not - adding a radiator will automatically mark the room as heated.
- Measure the ceiling height.
- Tapping Ceiling height will open the number pad to enter the ceiling height.
- Different rooms can have different ceiling heights.
- If there are multiple ceiling heights a list of currently entered ceiling heights will be available to choose from.
- Newly created rooms will be marked as the same height as the room they were created from by default.
- Lights – a count of both normal and low energy bulbs is available.
- If the room is a room in the roof
Heat loss
The best way to record heat loss types is using the EPC view of the plan. You get to the EPC view by tapping on this button in the bottom toolbar:

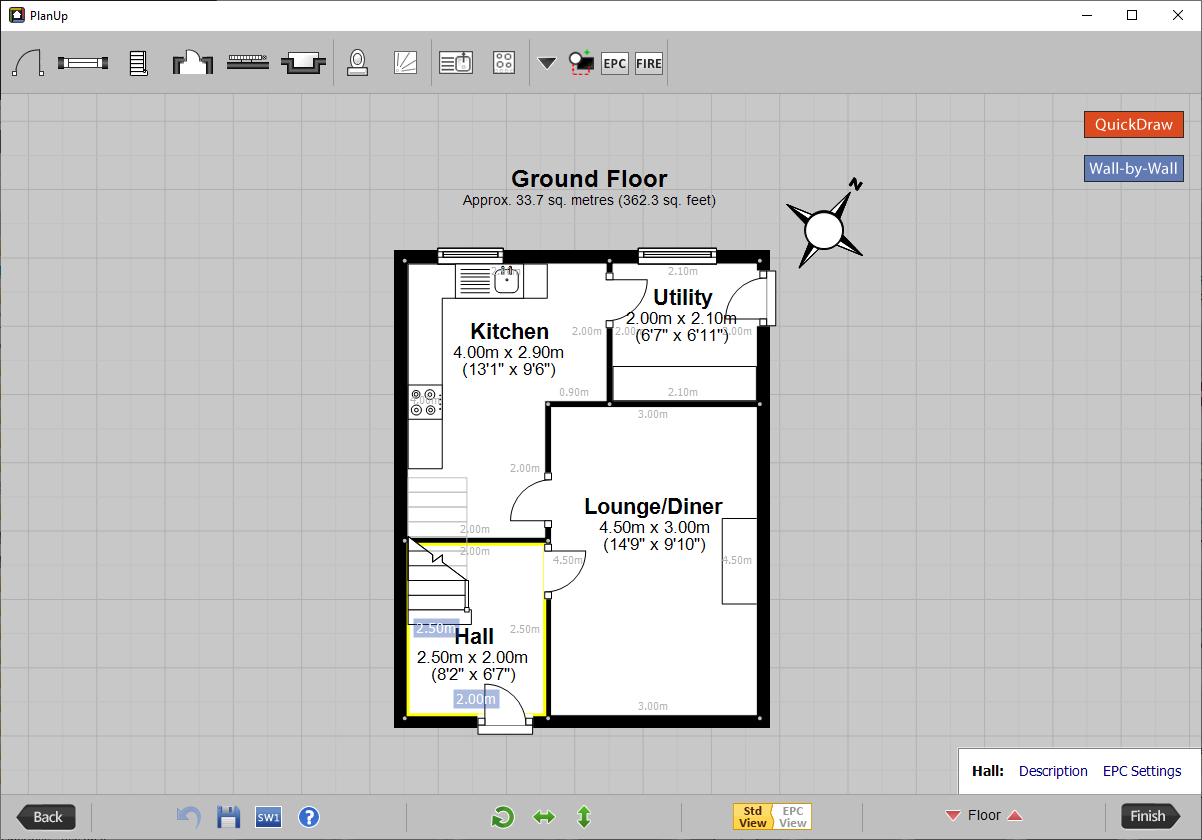
When in EPC view the colours will swap the other way around on the button and the plan view will change to look something like this:
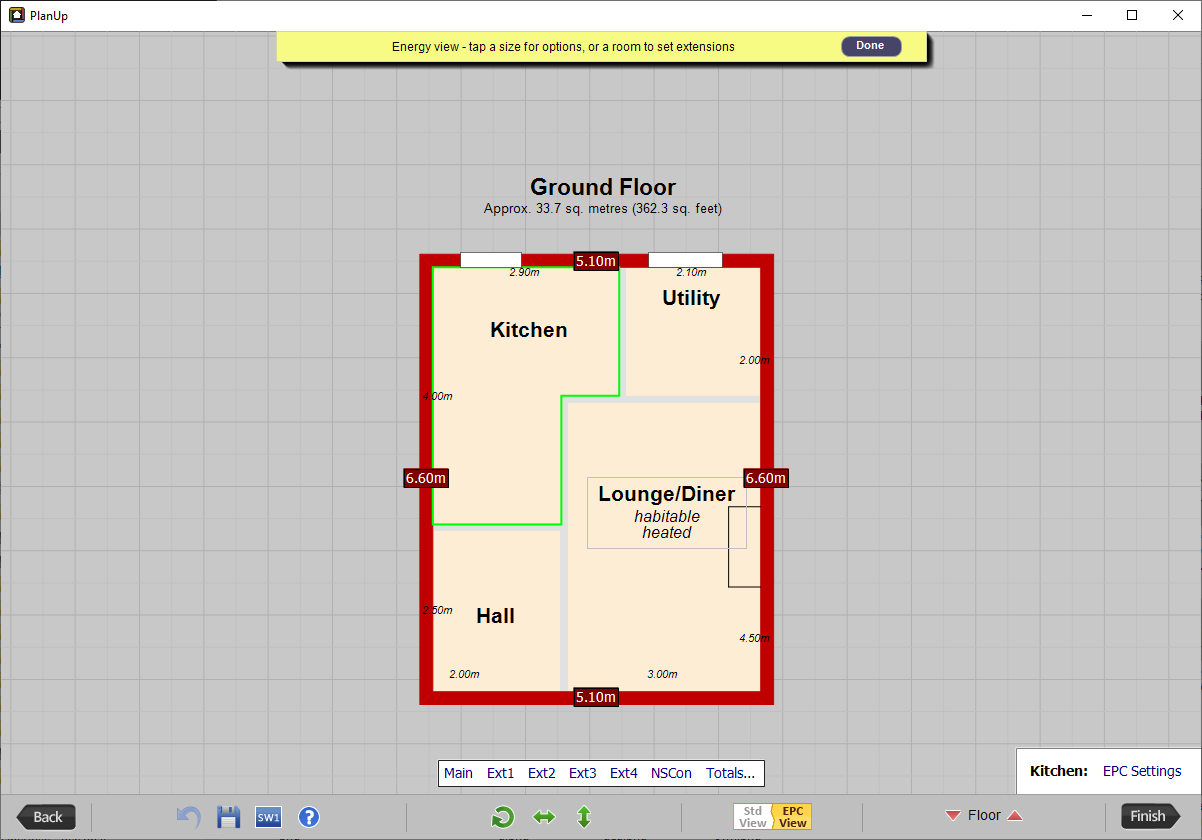
The default heat loss type is for HLP. To record other heat loss types:
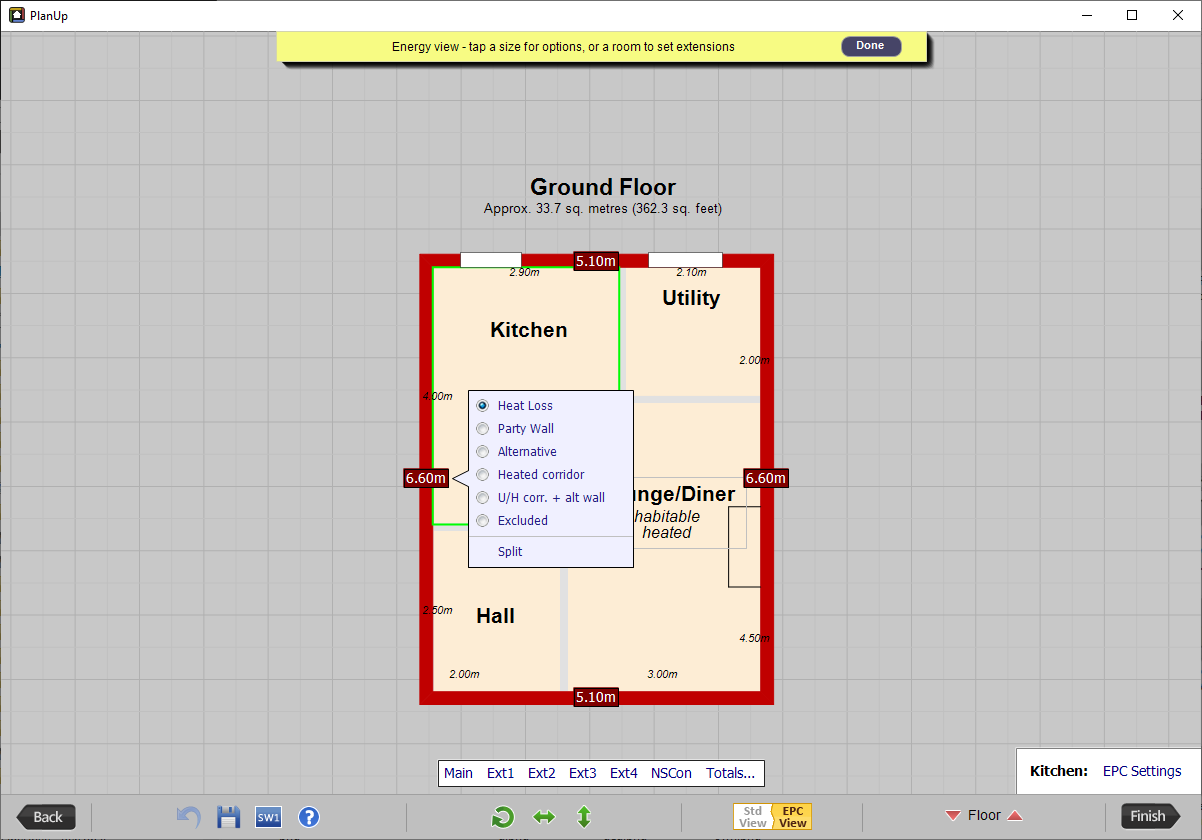
- Tap on the wall measurement in the red box.
- This will give you option to choose from for different heat loss types.
- The heat loss type will automatically run along the length of the wall unless part of this wall is part of an extension.
NB: Different heat loss types will be displayed in different colours.
Non-Separated Conservatories – Glazed Perimeter
If a room is marked as a non-separated conservatory you can select the heat loss type as glazed perimeter – this is only available for non-separated conservatories.
Alternative Walls
If you select the heat loss type as alternative you can record a different construction for the alternative wall types.
Any walls that are marked as alternative will have a wall area calculated. These areas will exclude any doors and windows added to the alternative walls. Please ensure the heights of these items have been added correctly to ensure correct calculations. Please see Item Specific Data for details.
Calculations for alternative wall areas are shown on the final EPC report.
IMPORTANT: You must have a ceiling height recorded for the alternative wall area to be calculated. See Room Specific EPC Data for more information on ceiling heights.
If you select the heat loss type as alternative you can record a different construction for the alternative wall types.
Calculations for alternative wall areas are shown on the final EPC report.
Can the wall be split into two heat loss types?
Yes. Please see how to split heat loss types for information.
Split wall between heat loss types
In order to split a wall between different heat loss types, you need to be in the EPC view of the plan. You get to the EPC view by tapping on this button in the bottom toolbar:
- Tap on the wall measurement that has two heat loss types.
- At the bottom of the popup menu there is an option to Split – tap on this.
- The wall has now split into two equal parts.
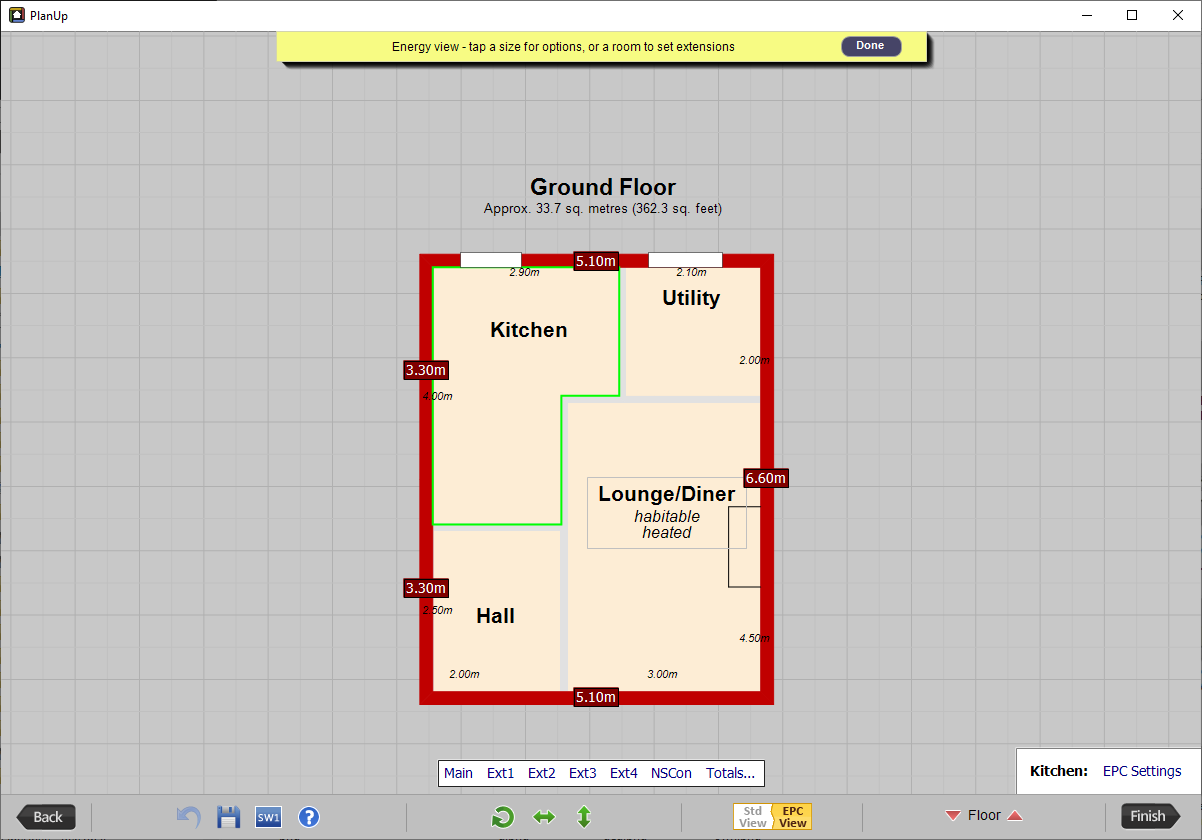
- You can now tap on one of these measurements, select Measure… from the top of the pop-up menu and change where the split is as required.

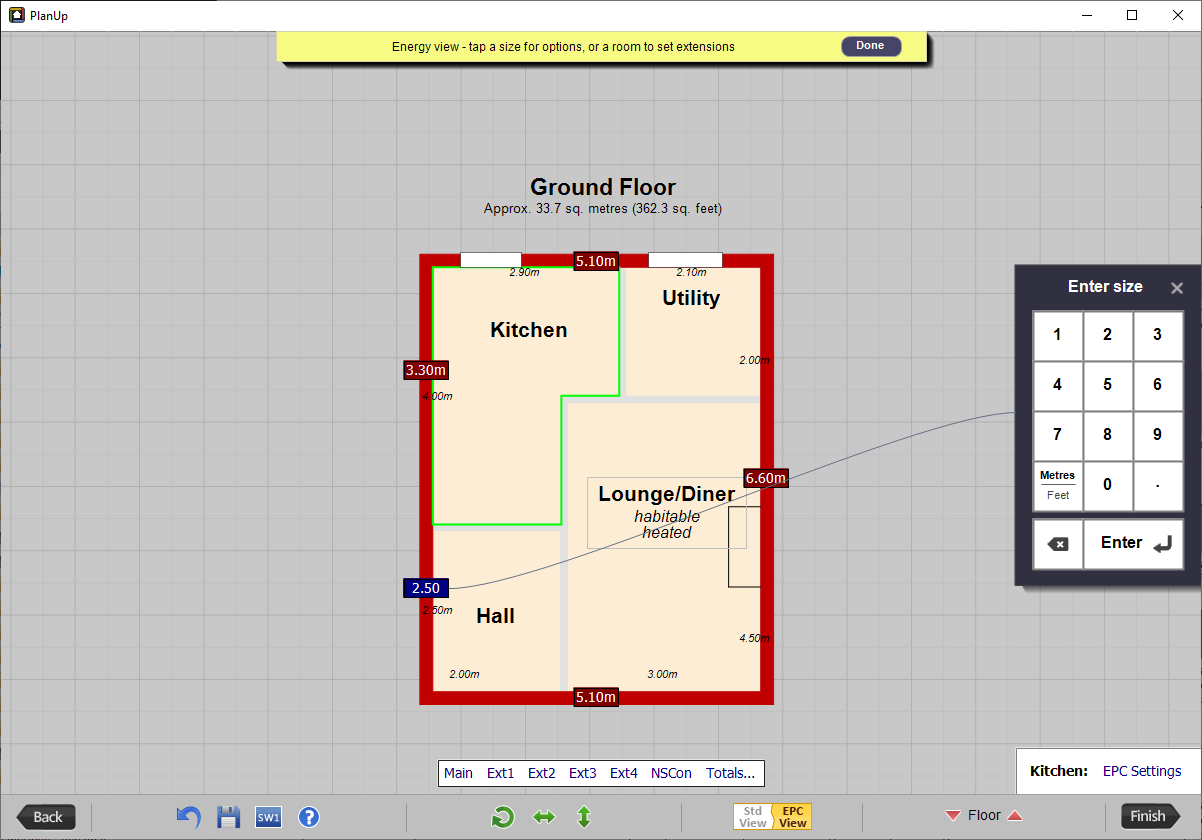
- Tapping on the measurements will also allow you to choose a different heat loss type for that section only.
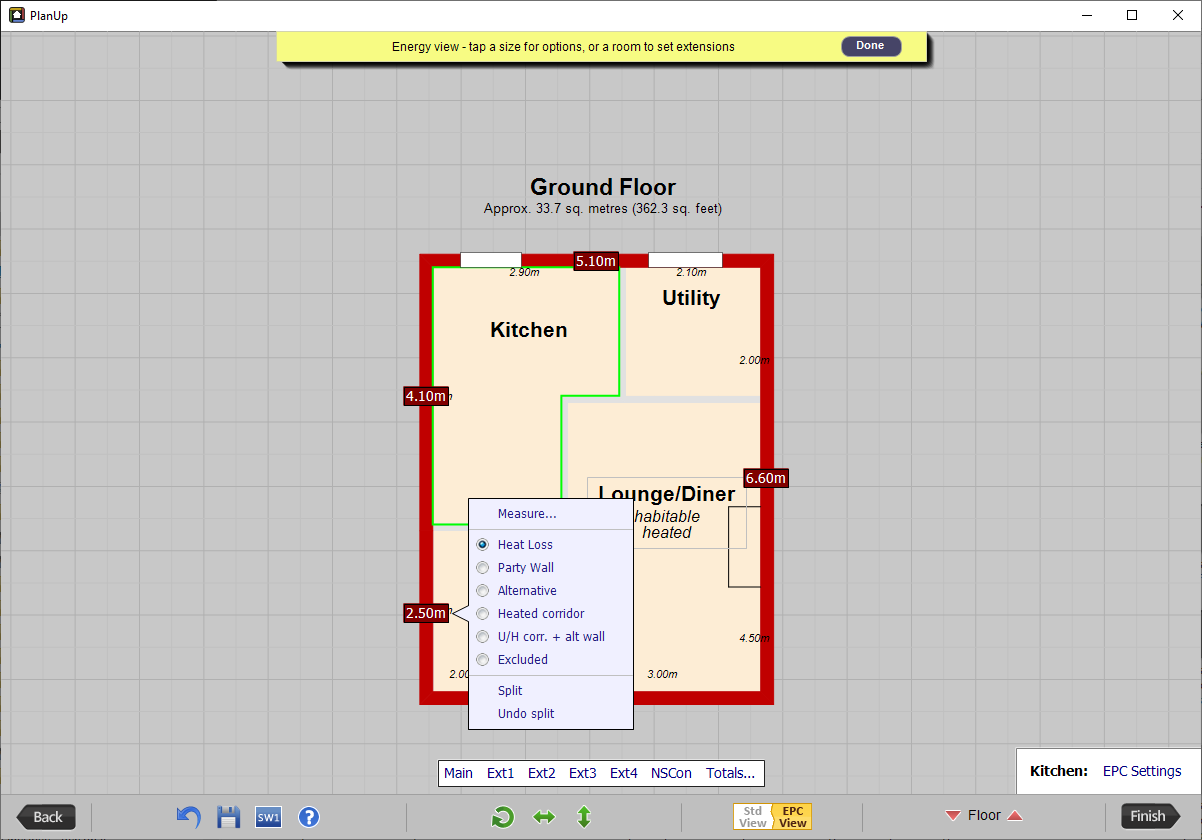
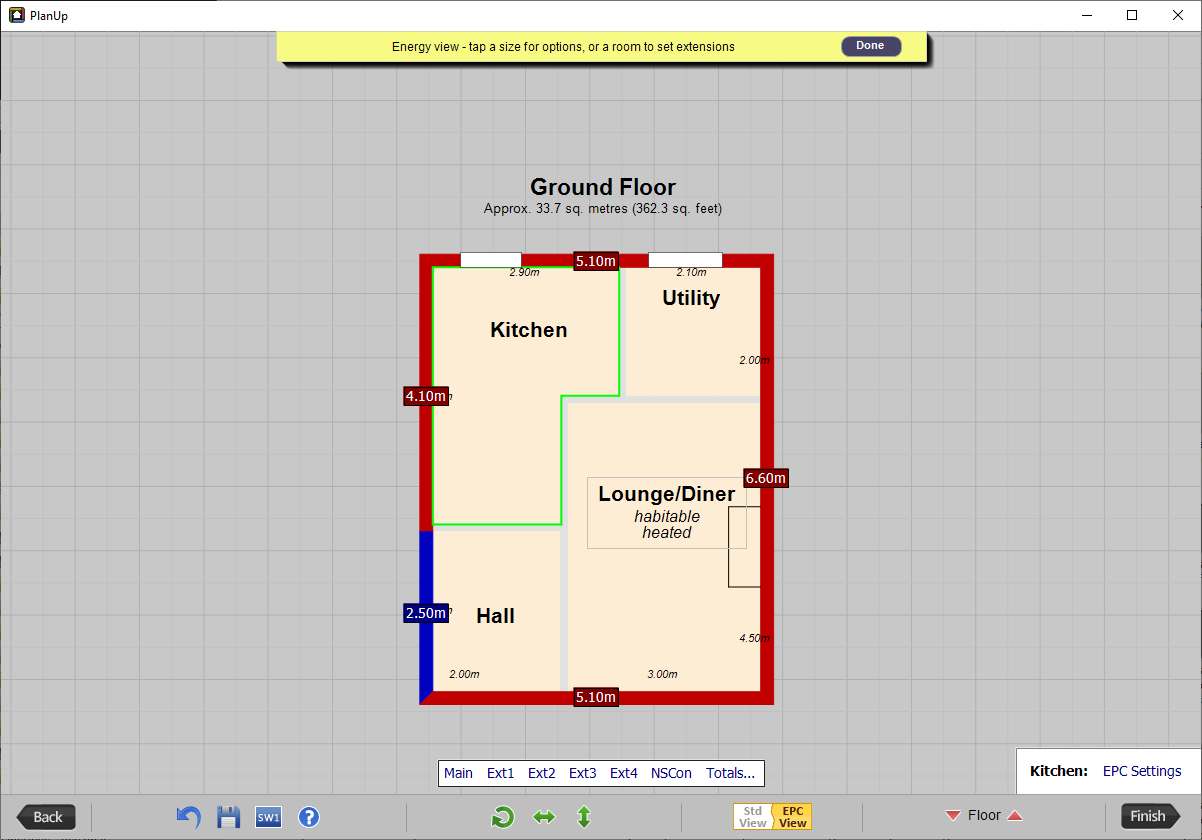
Heat loss can also be recorded by tapping on an external wall whilst editing the plan normally and tapping on Heat loss.
NB: You cannot split the heat loss types unless you use are using the EPC view.
Construction and insulation
You are able to record one construction type for part of the plan – main, and extensions 1-4. To do this:
- Tap on EPC Settings at the bottom right of the screen, then tap on Extension etc... to display the Room EPC Settings panel.
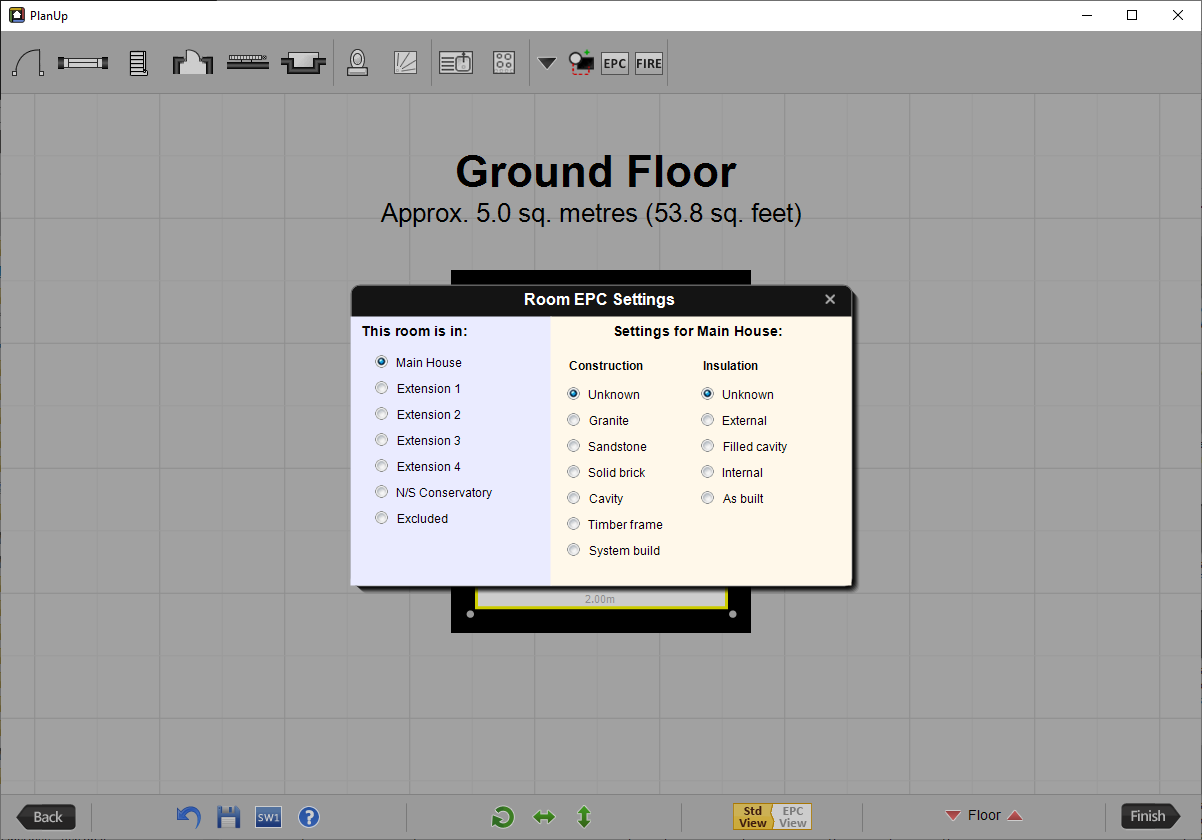
- On the left will be options for what section of the house the selected room is in.
- On the right you will have options for the Construction of the section the selected room is part of.
- Select as appropriate and tap the cross at the top right of the Room EPC Settings when done.
This can be done in either the EPC view or the standard view.
The selected room will have its given room title displayed next to the EPC Setting button. The selected room will also be highlighted with either a green (in EPC view) or yellow (in standard view) outline just inside the wall.
EPC Report
The report with the EPC data captured in PlanUp can be viewed by clicking on the link from any image email you request to be sent, or from the Direct Save options as detailed in Saving Final Images.
Additional features
There are some further symbols not listed above with some additional functionality that can help with plan information/display.
More ( )
)
From this sub menu you can add:
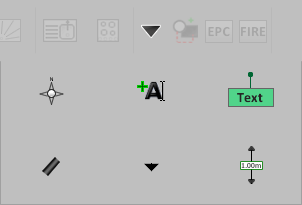
Compass
You can add a compass to show the orientation of the property.
Simply hover over the icon for the More sub menu (, tap if you are using a touch device), and the compass icon is the first icon on that menu.
Unlike other symbols, tapping on the compass icon instantly adds it to the plan, and allows you to set the direction by tapping/dragging on the plan as necessary.
When the direction has been set, tap done on the yellow banner at the top of the screen.

Additional Room Titles
On occasions you may want to add an extra title to a room to mark different areas.
To do this, simply select the additional room title icon from the More sub menu ( ), and then tap on in the room you wish to add the extra title to.
This will now give you the standard room title selection screen to choose as necessary or type a custom title.
When selected this will return you to the normal view with the additional title added. You can now drag this title where you want it in the room.
Notes
You can add notes to your plan to annotate as required. To do this:
- Select the notes icon from the More sub menu (
 ) and tap on the plan to add it.
 - Once added, you can tap and drag on the text box to move just the text box, leaving the marker in place. You can also use the handle on the marker to move just the marker and leave the text box where it is.
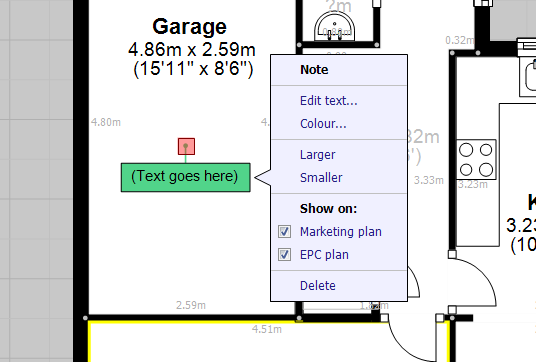
- From the pop-up menu on the Note you can:
- Edit text… - add/amend the text as required.
- Colour... - change the colour of the note and make it semi-transparent if required.
- Make the text Larger
- Make the text Smaller
- Show on/hide from the Marketing plan
- Show on/hide from the EPC plan
Freehand wall ( )
)
You can use freehand walls to show nub walls on open plan rooms or thicken walls.
Freehand walls are always attached to the main walls of a room. Once added handles are available to lengthen/thicken as required or rotate the wall.
To add a freehand wall simply select from the icon on the More sub menu and then tap on the plan where you want to add it.
Measurement arrow ()
This is simply a shape that can be added to indicate the points where displayed measurements were taken between.
Simply select from the menu and then tap where relevant on the plan.
Line/arrow ( )
)
Using this symbol, you can add full lines with measurement arrows. This could be used as an alternative to displaying room measurements or perhaps for surveyors indicating where pipe/wiring runs are or may be added.
To add the Line/Arrow tap on the symbol under the More menu and then tap to add to the relevant place on the plan.
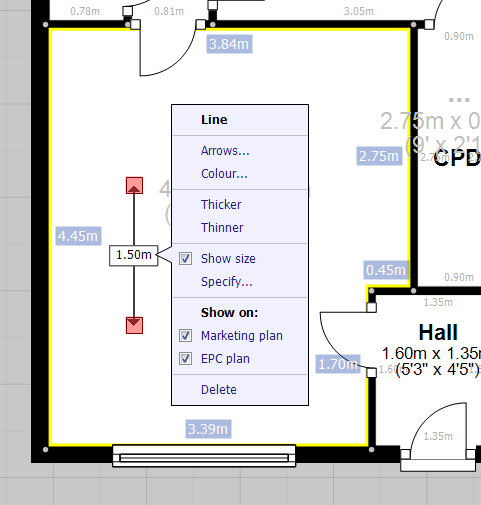
Once added you will see handles available at each end to adjust the length/positioning of each end, or to simply move the whole symbol tap and drag on the symbol.
From the menu you can:
- Click on Arrows… to select option for how to show arrows or remove the arrowheads completely to leave a simple line.
- Click on Colour… to change the colour of the symbol (if the measurement is showing, the text will always remain black).
- Change the thickness of the line using Thicker… or Thinner…
- Choose to show or hide the size.
- Choose Specify… to set the size, this will adjust the length of the line for you to match what you enter, please ensure the line is running in the right direction first.
- Show on/hide from the Marketing plan
- Show on/hide from the EPC plan
Shapes ( )
)
Here you will find here a number of shapes with different colour/line types.
These shapes can be resized, but the colour cannot be changed from that shown on the icon.
Please see the toolbar reference guide for a complete list.
Fire symbols ( )
)
Here you will find a selection of symbols to show the location of Fire Safety related items.
Please see the toolbar reference guide for a complete list.